Setting up the Integration with Gradient

The integration setting up involves three stages outlined in detail in Secure MSP Hub. To initiate the setup, navigate to the Integrations tab > MSP Ecosystem platforms, and under the Gradient section, select Start integration. The procedure consists of three subsequent steps in Secure MSP Hub:

  1. Sign up for Gradient

  2. Map customers and services

  3. Approve usage

In Gradient, you will need to go through four steps:

  1. Connect to vendor

  2. Account mapping

  3. Service mapping

  4. Review

Let's break down each step for a smoother integration process.

Procedure


Step 1

Sign up for Gradient

Begin by establishing a connection with your Professional Services Automation (PSA) system. Follow the instructions provided in the Secure MSP Hub to proceed.

  1. Start by selecting the Go to Gradient button. You'll be asked to confirm, and then you'll be redirected to Gradient.

  2. In Gradient, go to the INTEGRATIONS tab at the top of the page and find the Cisco Secure MSP Center integration. Hover over Ready to Connect and select CONNECT.

  3. Generate and copy the API token.

  4. Return to the MSP Hub, paste the token into the Gradient partner token field, and select Next.

  5. Review the Integration Agreement carefully, then confirm to move to the next stage.

Upon confirmation, the organization owner will receive an email notification confirming the action completion to prevent any misunderstandings.

Step 2

Map customers and services

At this step, map your customers and their services within Gradient.

Once completed, the Next button in Secure MSP Hub becomes accessible, allowing you to proceed.

  1. First, select Go to Gradient again. In Gradient, navigate to the INTEGRATIONS tab at the top of the page and locate the Cisco Secure MSP Center integration among the available options. Hover over Pending connection and select CONTINUE SETUP. This will take you to the first step—Connect to Vendor. Select Next to proceed.

  2. In the second step—Account Mapping—you will see customers created in MSP Hub listed on the right side under the Accounts section. Follow the on-screen instructions and use the filter icon next to each account to initiate search.

    If the name of an account in MSP Hub matches or is similar to the name in Gradient, it will be automatically matched, or you will be provided with options to choose from. If the names are different, enter the name of the corresponding service in the search field on the left and select the desired service from the options that appear.

  3. Drag and drop the account block onto the corresponding customer block. Then, select Next to move to the Service Mapping step.

  4. Map services created in Gradient from MSP Hub (shown on the right) with services (products) from your PSA, which you can find using the search field on the left. Map the services by dragging and dropping them. Proceed by selecting Next to reach the Review step.

  5. Ensure all accounts and services are correctly mapped. Double-check that no customer or service is left unmapped, as this could prevent usage data from being sent. When everything is correct, select Finish to start syncing information. Once completed, the Next button in Secure MSP Hub will become available, allowing you to proceed to the third step—Approve usage. Your usage data will be sent to Gradient automatically.

  6. Return to Secure MSP Hub and select Next.

Step 3

Approve usage

Review the settings and ensure everything is configured correctly.

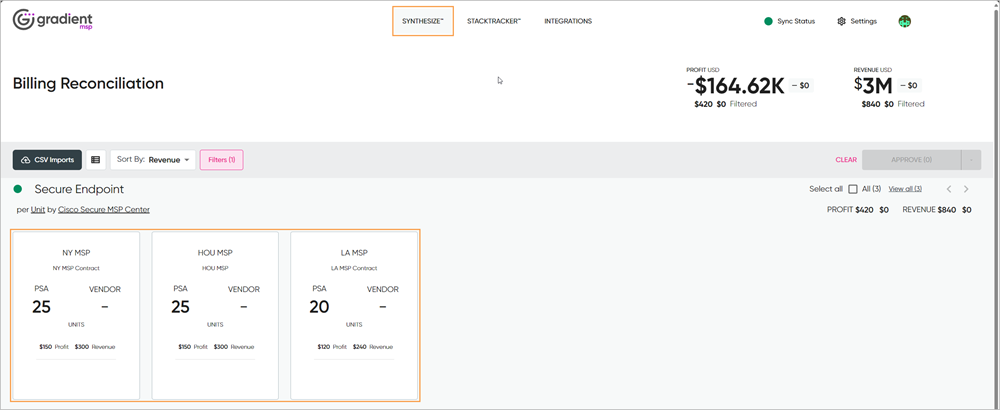
  1. Go to the SYNTHESIZE tab in Gradient and use filters to find your services. You will see cards displaying accounts and their related services. Each card shows the usage data sent from Secure MSP Hub.

  2. Review both the current and previous usage data. After reviewing, you can choose to approve or dismiss the usage for each account.